 Addendum from previous post: to create that flying sensation and brilliant staccato in the higher register, try tonguing further back than you would for the mid/lower registers! Your embouchure needs to be well set for the high and work with the lower lip to create space for the notes to sound. The lips also need to be strong enough so you don't end up pinching, which often happens in the beginning. It's about developing that very refined muscle memory to create a glow✨ in the sound.
0 Comments
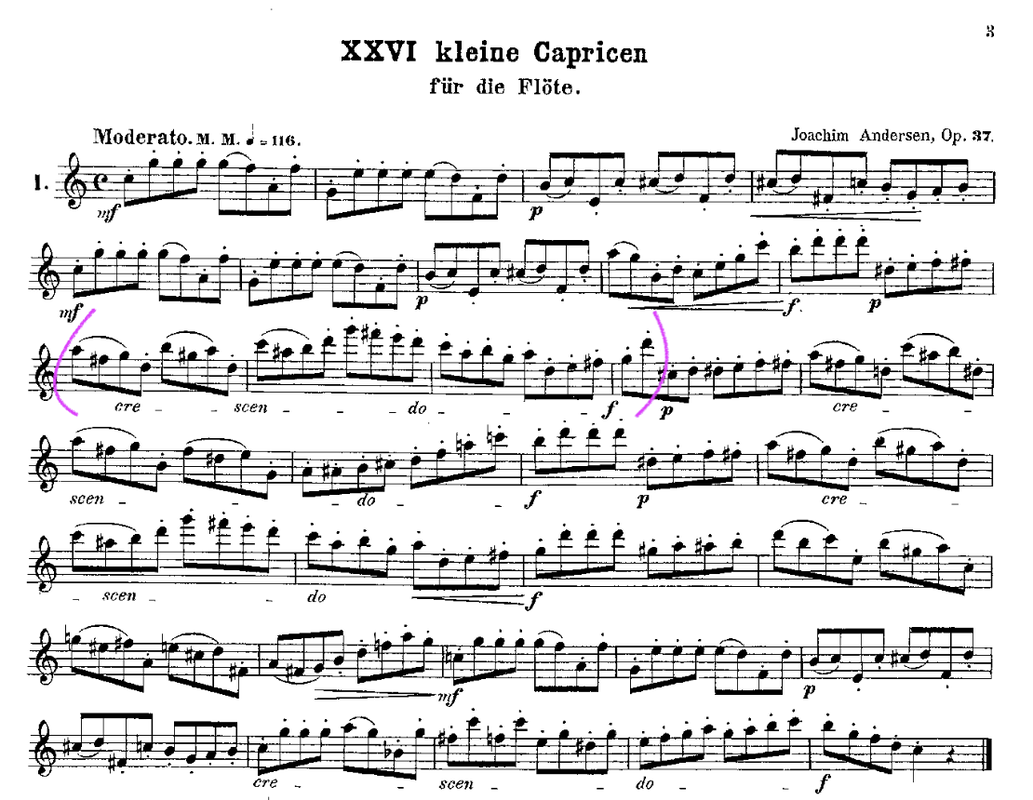
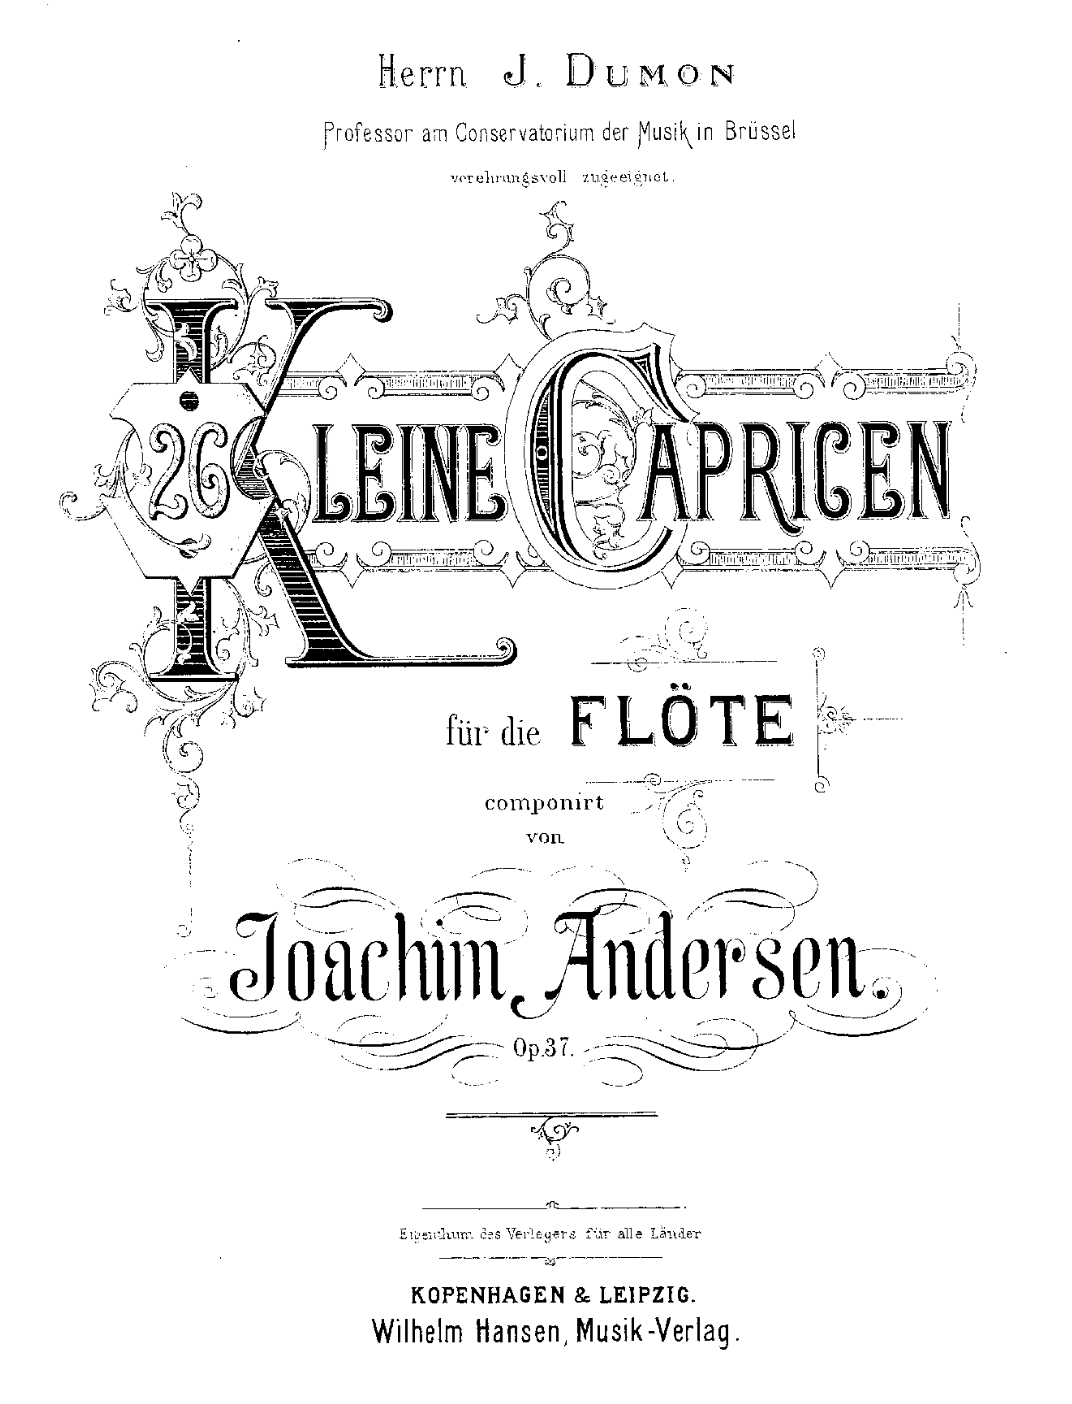
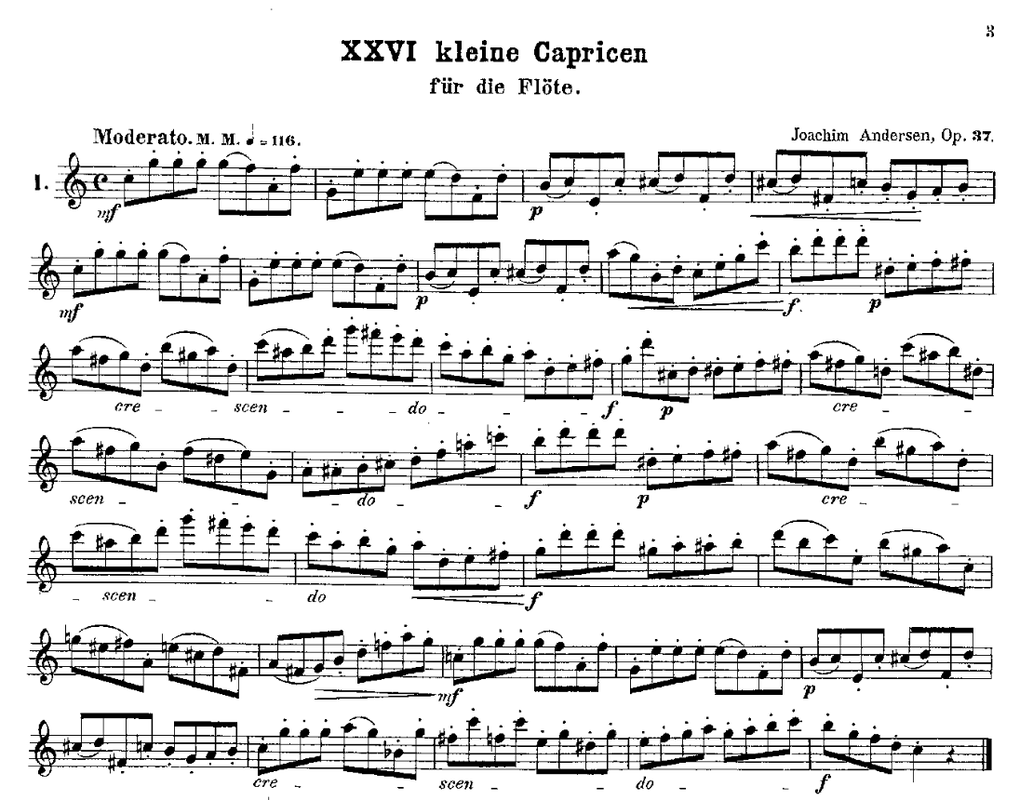
The C major etude from Andersen's Op. 37 is just such a fun piece to play. In fact, I really don't see it as an etude in the normal sense, but one could easily play this as a nice little encore piece.
In my recording, I've taken up the tempo quite a bit compared to what's indicated on the page. I encourage you all to always make expressive decisions in whatever you play. (technique and expression go hand in hand, but we'll get into that another time!) In this particular etude, Andersen is asking us to examine the flexibility and fluidity in our airstream in the presence of mostly staccato notes, with some occasional slurs mixed in. Staccato, although short, should still show direction and phrasing. Different types of staccati can be achieved by shaping your breath differently: - Should the air (sound) linger on or really cut off? - And how long should the sound go further? - How do dynamics play a part in the passage? Should the notes get louder but all stay equally short, or get softer but linger a bit in the air? (and many other exciting permutations in between!) - How do you direct your embouchure to create an effect? Do you need to slightly shape your lips to create that extra fine tapering in the sound, or have them stay put to have equal sounding lengths? There isn't just one kind of "short", and short doesn't mean less in any way. Short notes can give an incredible sense of depth and brilliance - this is especially important for the high register as often the notes up there can lose body, sounding dull and flat, especially if you have to play them short. Make sure you open your throat/chest/nose as much as you can, imagining the sound coming from deep down. Resist the temptation to simply blowing more and see if you can use the slowest and least amount of air to achieve a warm "glow" in the sound. I've also found, the more the hands can let go, the more your sound will ring. Always keep observing, listening, and feeling. When everything clicks in, it'll feel great! As you can see, articulation is not just about the tongue, but also very much connected to so many aspects of our playing technique. The fun is to be able to piece everything together and at the end, see what you can do to make that final personal touch to create your signature interpretation! In my case, I envision trapeze artists defying gravity and tumbling across the air with this piece. Easter Season is in full swing and that means playing passions in Germany. This season I've got only J.S. Bach's St. John Passions, which has allowed me to look at the work in closer detail. Compared to the St. Matthew, the St. John is really "action-packed" and has a lot of rewarding passages for the flute. One of which is the famous (or infamous) 16ths which often accompany the crowd scenes in the storyline: 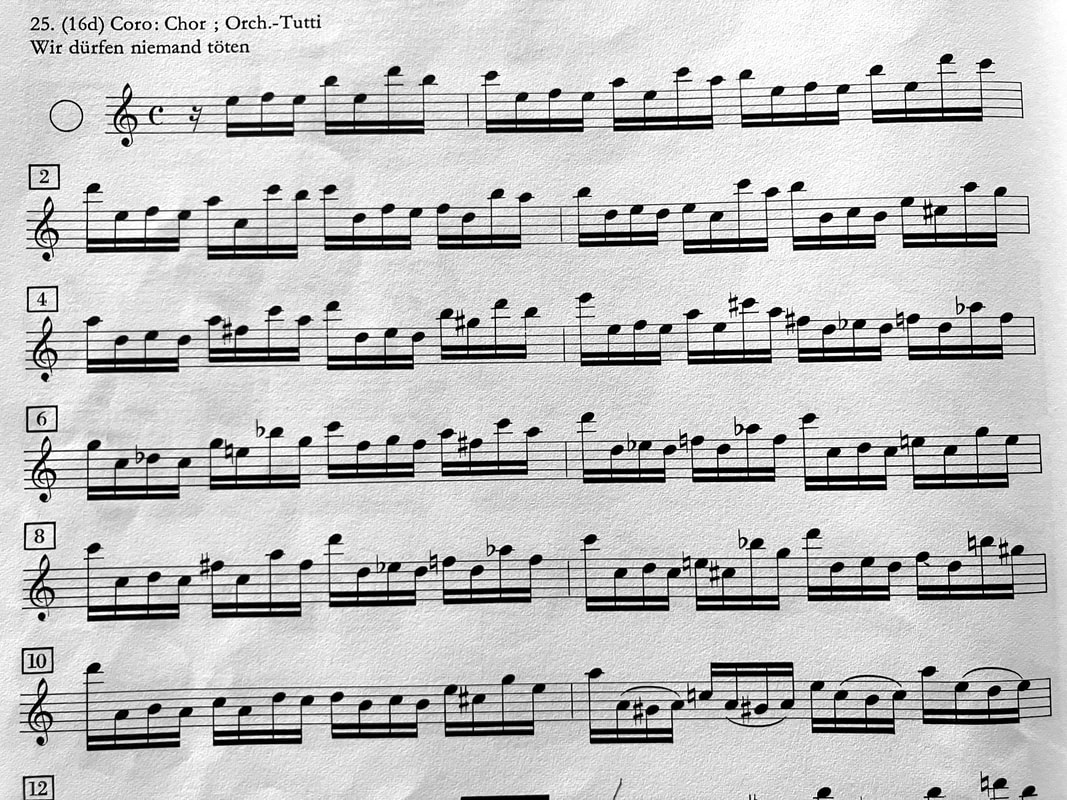 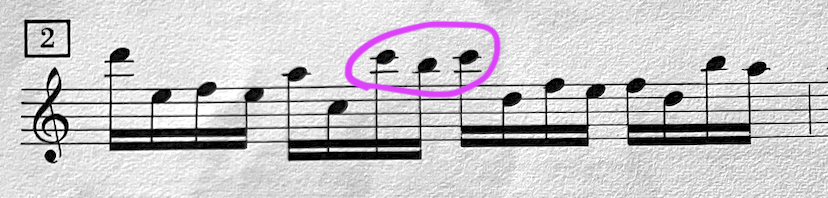 I believe amongst flutists, you're either in the camp of finding Nr. 16d (the longest of this kind of passage) really exciting or you loath it. I happen to find it exciting, but then again maybe it's because with the greatest luck so far, I haven't felt challenged by the tempo wished by the conductor (fingers crossed!!!). Listen on YouTube and you'll find a wide range of tempi, as well as tempi differing within the various moments that these 16ths appear in the entire work.
I find it exciting because beyond the fact that the 16ths go on forever, it's such a great moment for getting your sound, breath work, and articulation right in line with each other. In my opinion, I don't think this should be super fast, because it would be such a pity to not be able to hear and be astounded by what incredible harmonies Bach has embedded here. Hence, it should be at a tempo where one could still single tongue, with lots of variety to create a wonderful light and shadow effect. I could easily write many entries about this passage, but let me get to the reason why I wanted to post today, which is about using the alternate B-natural fingering in the second register. It's fingered as such: xoo xxx x Remember that the key closes the hole when we don't press on it. The reason why this popped into my mind is because at our recent Matthew Passion workshop, we talked about how useful this fingering is, especially if one wants to have a very piano B-natural that blends well and is in tune with the others. In this particular passage in the St. John, it's useful because it's similar to the fingering of the neighbor note C-natural, notice how many right-hand notes can stay put between those two fingerings, including going on to the next note D-natural. One aspect about finger technique to keep in mind is that anything involving the 4th finger can be a little challenging. This would be a great spot for the application of that B-natural fingering, and I just discovered it this season! However, understand also that using alternate fingerings is a very personal choice, what works well for one person won't necessarily mean the same for another. There are other times when I prefer to use the regular, perhaps somewhat more cumbersome fingering, because it helps me to slow down and not rush. Mostly, technical problems occur because we rush with our fingers. When making fingering decisions, whatever you decide, make sure you commit to your decision unless you have a very good reason to change it again. Don't confuse your fingers with too many options! What's a favorite alternate fingering you like to use in this passage? 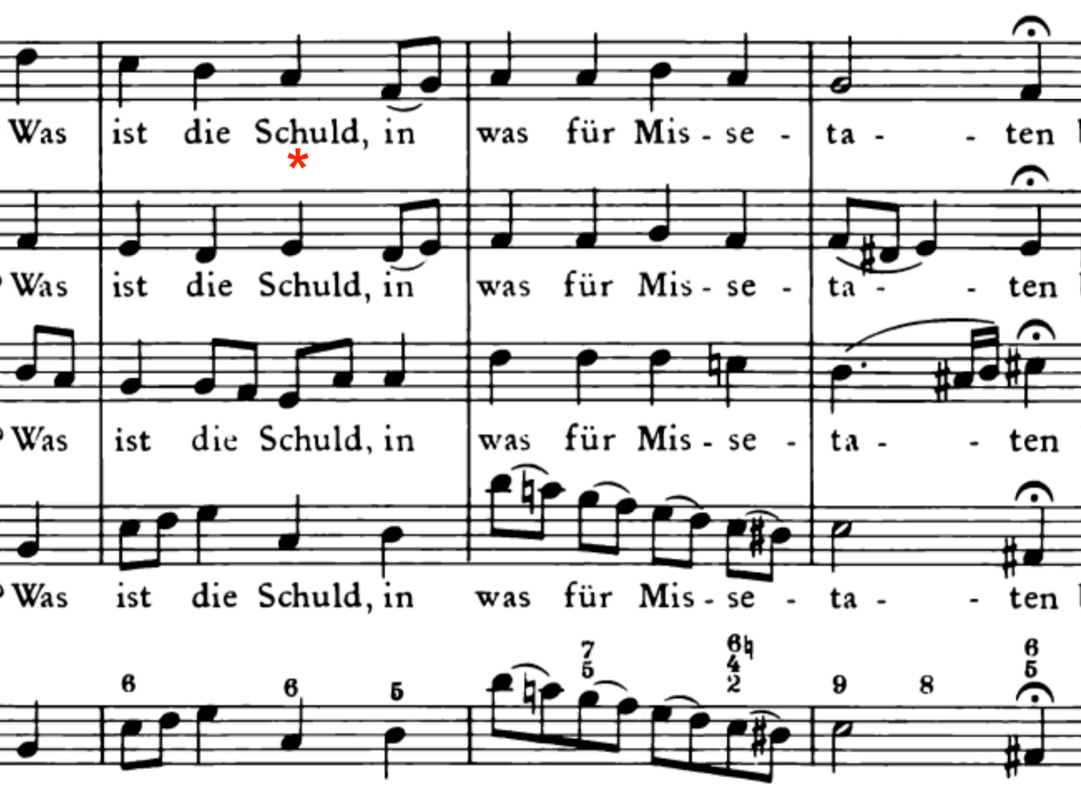 As I'm preparing for our upcoming Bach St. Matthew Passion workshop, here's a little music analysis which I feel is exciting to share:
Besides the solos in this monumental work, there are these many seemingly "easy" chorales to play. However, these chorales were very important as they would have been well-known to the congregation. They brought everyone spiritually together, including the layperson who might not understand the meanings of the big arias. Conveying the text through the albeit simple melody is the key in playing them. Take a look at this excerpt from "Herzliebster Jesu, was hast du verbrochen". (Dear beloved Jesus, how have you transgressed) from his St. Matthew Passion. There are 3 things that are happening around the word "Schuld" (guilt in the legal sense, or crime): - It's an important word in the text - the "d" in "Schuld" is more like a "dt" in German pronunciation which gives the word a definite closure - There's a comma afterwards So all these things make the end of that "Schuld" note slightly detached from the rest, the sound has to close before going on, creating an "articulation silence", in order to reflect those same nuances in the text. In baroque flute playing, it is common to use the technique of closing the sound with the tongue. Going on directly or making the sound legato with the next note will degrade both the literal and emotional intent of the passage. The concept is simple and yet it can have such a profound effect on us players as well as on our listeners. This is just one of many, many instances in the endless connections between music and text, and it's a whole lot of fun to discover them! Playing chorales this way will then become meaningful and create a defined musical presence in the performance.  In my recent talk together with Amanda Markwick, we delve into the question of what makes the music of J.S. Bach so challenging.
For me, it's definitely the amount of stamina needed, mentally and physically. Playing Bach's music can feel like a test of how well we can coordinate all of our techniques to function together. We first need to have a concept about the music, then arrange all what needs to happen physically: breath work and management – how we regulate our air to produce sound, just like singers do. In addition, Bach's music is notorious for us flutists because we're struggling to find good places to breathe! The question is - where and how to breathe? Articulation – Having our articulation contribute to the affect of the passage. Knowing early articulation methods is a key to that. Navigating difficult keys – Navigating through difficult keys is related to our breath, our embouchure, and coordination with the fingers. Bach wrote some of his greatest works for the flute in the worst keys for us. Think about “Zerfließe mein Herze” from his St. John Passion, or the E major flute sonata. (we don't even get a break in between - no comfort in C# minor!) So all these physical elements need to function together, at the same time, on command to carry out our interpretation. That's a tall order! It IS a challenge but I also see it as motivation. Flute-playing is a physical activity and the practice of it (whether 'practicing' or performing) makes me feel strong and builds confidence in my body. I do enjoy feeling that physical aspect of the challenge and the reward it brings. Another challenge I see with Bach's music is simply finding those important clues which help us in our interpretation. It's like solving a jigsaw puzzle. Because of the common practice back then, things like dynamics and phrasing were mostly not given by the composer (unlike in later music). But that's Bach's trust in us that we're able to nevertheless understand his intentions. Or perhaps we can think of it like a game we play with Bach – he gives us some clues, can we get what he's talking about? |
ABOUT THE BLOG:I got inspired to document my own observations in flute-playing and music-making. Also, I thought it's important to pass on the teachings of the great Wilbert Hazelzet, as well as many other mentors who have influenced my artistic visions one way or the other. Enjoy this potpourri of tips, inspirations, and musings. TOPICS:
All
👉"Teddie Talks Traverso" on YouTube
WorkshopsTEACHING:I'm specialized in coaching historical and modern flutists. CONTACT ME directly to set up a session, in person or online. Archives
May 2024
|
 RSS Feed